示例:React Native App集成CodePush热更新,从零开始
本示例从零开始演示如何将CodePush(中国)热更新功能集成到React Native App中。本示例演示了从创建一个React Native应用开始,到如何集成CodePush(中国)热更新功能,直到最后对热更新功能进行测试。
由于React Native版本和环境的差异性,若您在使用过程中遇到问题,请与我们联系。
Step 1:创建React Native项目
鉴于不同版本与环境的差异性,导致有些小伙伴在安装配置时遇到一些莫名的问题,因此我们提供了一个模板,你可直接在此模板的基础上创建你自己的项目。
如果你使用模板创建项目,则可跳过 Step 1 至 Step 4,直接进入 Step 5 。
在这个示例中,将项目建立在
E盘的test目录下,并且项目的名字为myapp。
打开命令行窗口,进入
E:\test\目录,执行以下命令创建项目:
npx react-native init myapp
Step 2:在CodePush(中国)创建对应的应用
为了使用CodePush(中国)提供的服务,需在CodePush(中国)上创建对应的应用。
进入CodePush(中国)的控制台,并登入。如果还没有帐户,则注册一个新帐户。
点击页面上的
创建应用,在弹出的面板中填写相应的信息,以创建应用。应用的名称可任意填写,只要不与其它应用重复就行了。
因为这个示例即有Android版,也有iOS版,所以需要在CodePush(中国)的控制台中为Android版和iOS版各创建一个应用。
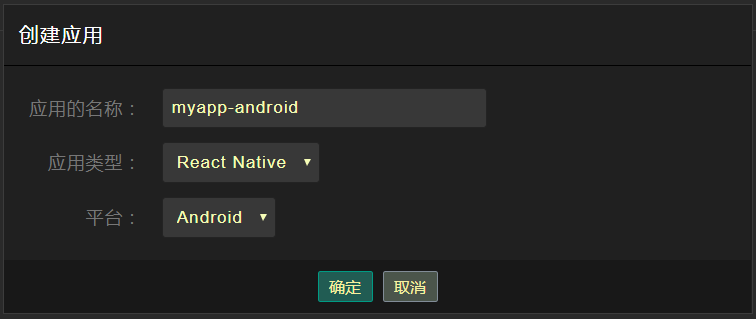
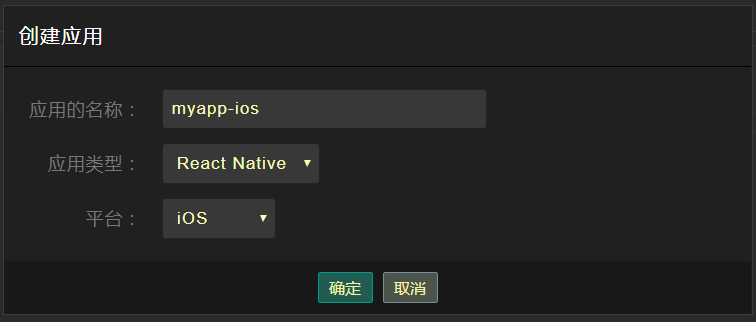
如果你的应用只打算开发Android版或iOS版中的一个,则只需创建一个即可。
Step 3:安装及配置CodePush(中国)前端插件(cpcn-react-native)
使用cpcn-client桌面工具来完成此步骤的工作。
如果你的电脑上还没有安装cpcn-client,则点击这里下载并安装它。
打开电脑上安装的cpcn-client,登入后,将能看到刚刚在
控制台中创建的两个应用:myapp-android和myapp-ios。
点击
myapp-android应用的名字,将会打开一个面板。在打开的面板中,设置项目文件夹,即E:\test\myapp。点击install cpcn-react-native,等待执行完毕。
注意:这可能需要一点时间,请耐心等待执行完毕。(建议开启
科学上网方式后执行此操作)
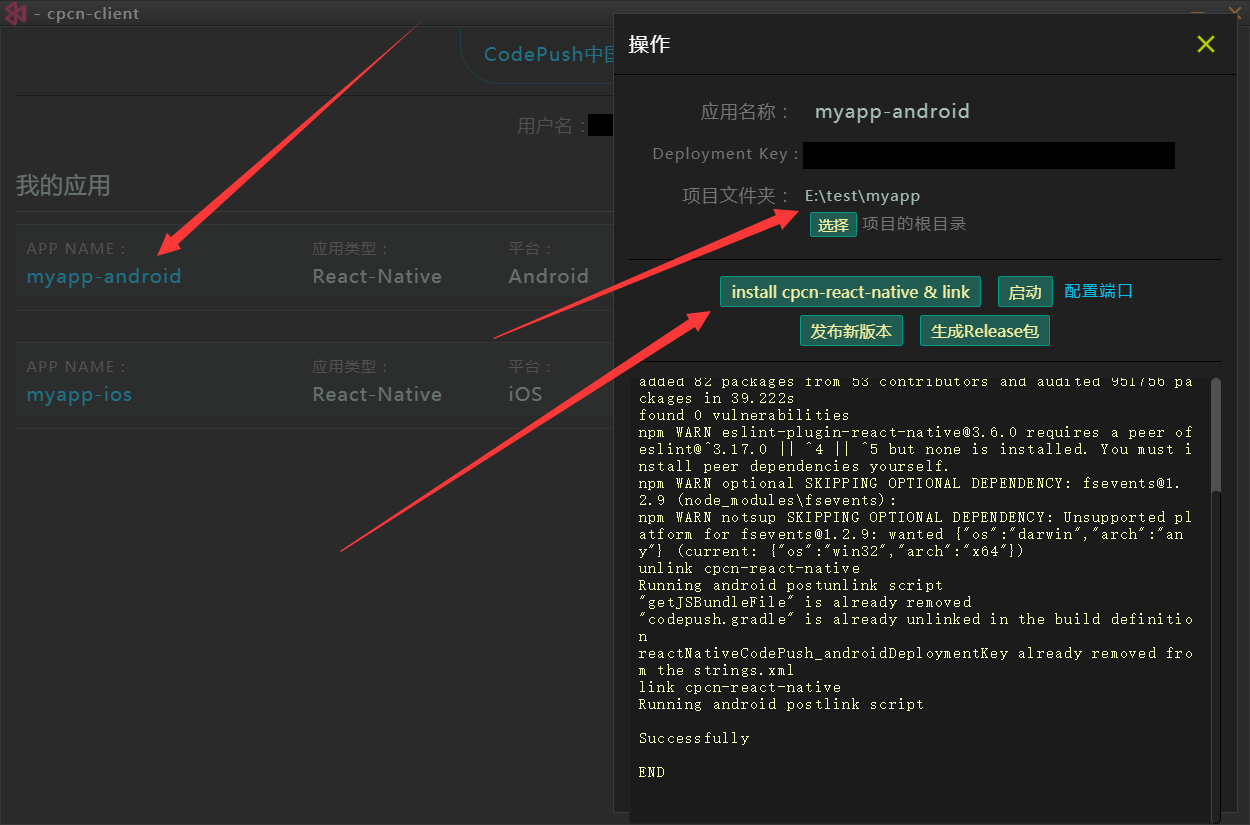
由于iOS版需在Mac电脑上运行和测试,因此需在Mac电脑上为
myapp-ios重复以上的操作。
注意:对于iOS版,在执行以上操作时可能会遇到错误。这是
cpcn-client的一个未处理的Bug,可忽略它,然后开启科学上网,在命令窗口中进入项目文件夹,并执行以下命令:
npx pod-install
注意:对于iOS版,不要直接执行
npx pod-install,应该先在cpcn-client上点击install cpcn-react-native,然后再执行npx pod-install。
等待执行完毕后,
cpcn-react-native就安装并配置成功了。
注意:对于iOS版,可能需要修改
/ios/项目名/info.plist,使App能进行HTTP访问:
<key>NSAppTransportSecurity</key>
<dict>
  <key>NSAllowsArbitraryLoads</key>
  <true/>
</dict>
Step 4:代码实现
用你喜欢的任意代码编辑器(例如:VS Code)打开项目源码(
E:\test\myapp)。
为了使这个示例代码更清晰易读,将
/App.js中的代码修改为下面这个样子:
import React from 'react';
import { SafeAreaView, View, Text } from 'react-native';

class App extends React.Component {
    render() {
        return (
            <SafeAreaView>
                <View>
                    <Text>Ver: 1</Text>
                </View>
            </SafeAreaView>
        );
    }
};

export default App;
这个示例需要实现的效果是:当有版本需要更新时,弹出对话框提示用户需要更新,当用户确认更新后,开始下载并应用新版本,并且需显示下载进度。
在
/App.js中加入对话框和显示下载进度的代码:
import React from 'react';
import { SafeAreaView, View, Text, Button, Modal } from 'react-native';

class App extends React.Component {
    constructor(props) {
        super(props);
        this.state = {
            upgradeState: 0,
            upgradeAllBytes: 0,
            upgradeReceived: 0
        };
    }

    upgradeContinue = () => {
        // TODO: continue upgrade
    }

    render() {
        return (
            <SafeAreaView>
                <View>
                    <Text>Ver: 1</Text>
                </View>
                <Modal
                    visible={this.state.upgradeState > 0}
                    transparent={true}>
                    <View style={{padding:18, backgroundColor:"rgba(10,10,10,0.6)", height:"100%", display:"flex", flexDirection:"row", alignItems:"center"}}>
                        <View style={{backgroundColor:"#fff", width:"100%", padding:18}}>
                            {
                                this.state.upgradeState == 1
                                &&
                                <View>
                                    <View style={{paddingBottom:20}}>
                                        <Text>发现新版本</Text>
                                    </View>
                                    <View>
                                        <Button title="马上更新" onPress={this.upgradeContinue}/>
                                    </View>
                                </View>
                            }
                            {
                                this.state.upgradeState == 2
                                &&
                                <View>
                                    <Text style={{textAlign:"center"}}>{this.state.upgradeReceived} / {this.state.upgradeAllBytes}</Text>
                                </View>
                            }
                        </View>
                    </View>
                </Modal>
            </SafeAreaView>
        );
    }
};

export default App;
在这个示例中,用
Modal来做提示对话框。用this.state.upgradeState来控制对话框是否显示,当this.state.upgradeState的值大于0时则显示,其中,当this.state.upgradeState的值等于1时显示“提示更新”的消息,当this.state.upgradeState的值等于2时显示“下载进度”。
接下来,使用
cpcn-react-native提供的check(options)方法检查是否有可用的新版本、以及下载和应用新版本。为了使App启动时自动检查新版本,可将相关代码写在/App.js的componentDidMount中:
import React from 'react';
import cpcn from 'cpcn-react-native';
import { SafeAreaView, View, Text, Button, Modal } from 'react-native';

class App extends React.Component {
    constructor(props) {
        super(props);
        this.state = {
            upgradeState: 0,
            upgradeAllBytes: 0,
            upgradeReceived: 0
        };
    }

    componentDidMount() {
        cpcn.check({
            // 检查是否有新版本后调用此方法
            checkCallback: (remotePackage, agreeContinueFun) => {
                if(remotePackage){
                    // 如果 remotePackage 有值,表示有新版本可更新。
                    // 将 this.state.upgradeState 的值设为1,以显示提示消息
                    this.setState({
                        upgradeState: 1
                    });
                }
            },
            // 下载新版本时调用此方法
            downloadProgressCallback: (downloadProgress) => {
                // 更新显示的下载进度中的数值
                this.setState({
                    upgradeReceived: downloadProgress.receivedBytes, // 已下载的字节数
                    upgradeAllBytes: downloadProgress.totalBytes // 总共需下载的字节数
                });
            },
            // 安装新版本后调用此方法
            installedCallback: (restartFun) => {
                // 新版本安装成功了,将 this.state.upgradeState 的值设为0,以关闭对话框
                this.setState({
                    upgradeState: 0
                }, () => {
                    // 调用此方法重启App,重启后将会使用新版本
                    restartFun(true);
                });
            }
        });
    }

    upgradeContinue = () => {
        // 用户确定更新后,调用此方法以开始更新
        cpcn.agreeContinue(true);
        // 将 this.state.upgradeState 的值设为2,以显示下载进度
        this.setState({
            upgradeState: 2
        });
    }

    render() {
        return (
            <SafeAreaView>
                <View>
                    <Text>Ver: 1</Text>
                </View>
                <Modal
                    visible={this.state.upgradeState > 0}
                    transparent={true}>
                    <View style={{padding:18, backgroundColor:"rgba(10,10,10,0.6)", height:"100%", display:"flex", flexDirection:"row", alignItems:"center"}}>
                        <View style={{backgroundColor:"#fff", width:"100%", padding:18}}>
                            {
                                this.state.upgradeState == 1
                                &&
                                <View>
                                    <View style={{paddingBottom:20}}>
                                        <Text>发现新版本</Text>
                                    </View>
                                    <View>
                                        <Button title="马上更新" onPress={this.upgradeContinue}/>
                                    </View>
                                </View>
                            }
                            {
                                this.state.upgradeState == 2
                                &&
                                <View>
                                    <Text style={{textAlign:"center"}}>{this.state.upgradeReceived} / {this.state.upgradeAllBytes}</Text>
                                </View>
                            }
                        </View>
                    </View>
                </Modal>
            </SafeAreaView>
        );
    }
};

export default App;
上面的代码量很少,也比较好理解。请留意以上代码中的注释。
Step 5:验证一下
通过以上的工作,热更新的功能已经添加到React Native App中了。接下来需要验证一下热更新功能是否能正常运作。
为了使测试更接近真实环境,将以上开发的App打个Release包来进行验证。
对于 Android 版,在
命令窗口中进入项目的根目录并执行以下命令来生成 release 安装包:
npx react-native run-android --variant=release
如果你的环境不支持以上命令,可尝试用以下命令生成 release 包:
npx react-native run-android --mode=release
对于 iOS 版,在
命令窗口中进入项目的根目录并执行以下命令来生成 release 安装包:
npx react-native run-ios --configuration Release
如果你的环境不支持以上命令,可尝试用以下命令生成 release 包:
npx react-native run-ios --mode Release
通过以上
命令生成的Release包通常会自动安装到模拟器上,如果没有,则手动将其拖放到模拟器上。
在模拟器中打开刚刚安装的App,它现在是这样子的:
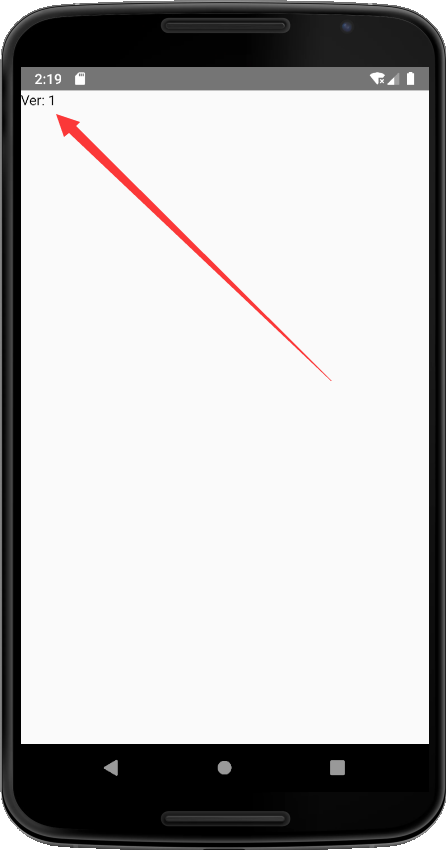
可以看到,现在App界面上显示的是
Ver: 1。
现在,发个新版本到服务器。
先将代码稍做修改。将
/App.js中的以下代码段:
<View>
    <Text>Ver: 1</Text>
</View>
修改成:
<View>
    <Text>Ver: 2</Text>
</View>
再次回到
cpcn-client,点击发布新版本:
注意:这可能需要一点时间,请耐心等待执行完毕。
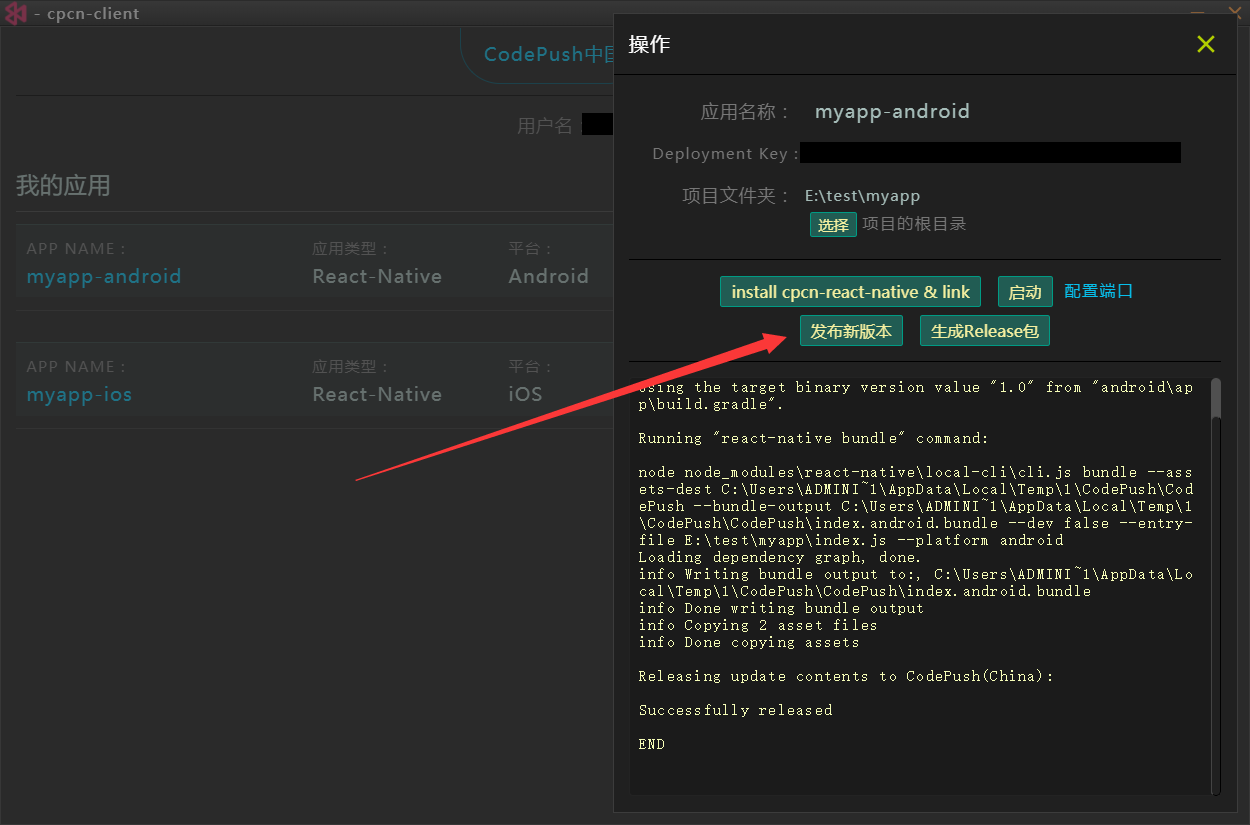
等待执行完毕后,新版本就已发布到服务器了。
注意:对于iOS版,在
发布新版本时有可能会遇到CFBundleShortVersionString不正确的错误。这是已知的一个小Bug。你需要修改/ios/项目名/info.plist文件,将CFBundleShortVersionString的值修改为正确的版本号,例如:1.0.2。修改后应该是像下面这样子的:
<key>CFBundleShortVersionString</key>
<string>1.0.2</string>
注意:如果遇到了此错误,应该在修改
CFBundleShortVersionString的值后,再重复之前的操作,即先生成Release安装包并安装到模拟器上,然后将/App.js中的Ver: 1修改为Ver: 2,然后再发布。否则有可能会导致Release包与发布的包的版本号不一致。
回到模拟器,关闭之前打开的App,重新打开它。这时候将会看到“发现新版本”的提示消息了:
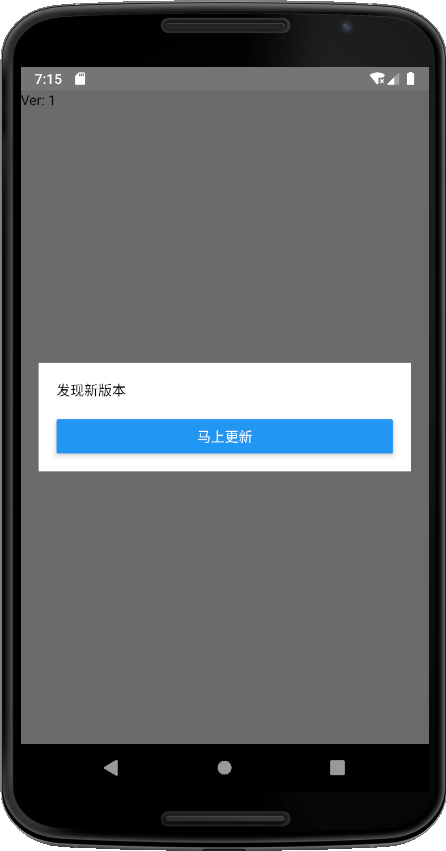
点击
马上更新后,将会看到“下载进度”,由于这个示例需要更新的内容比较少,所以可能只是一闪而过。接着App将会自动重启,重启之后,就能看到已经是最新版本了:
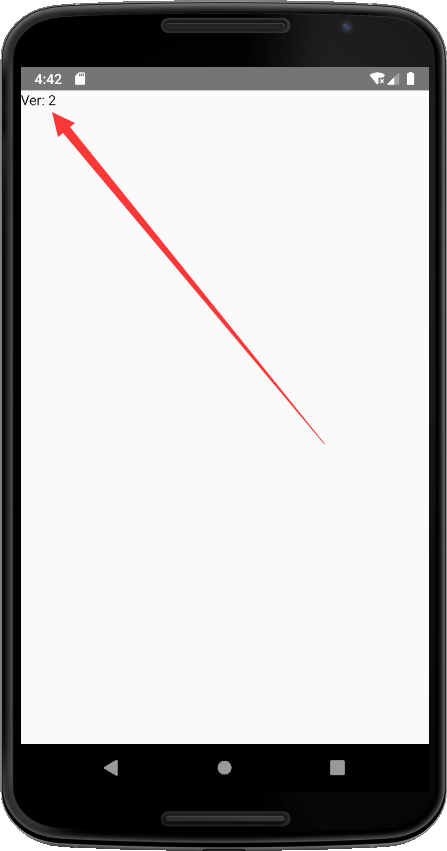
以上就是从创建一个React Native项目,到最后测试热更新功能的所有步骤。